
Picture this: you’re on a river, your new raft gliding through the water like it’s auditioning for a movie about the ultimate fly fishing experience. Everything feels dialed in. But getting to this blissful moment? That’s a journey. Let’s navigate it together, step by step with a dose of humor and the kind of overthinking that makes everything more interesting. You want this to work out well and it will have either a positive, or a negative impact on your future fishing journeys so don’t go into it lightly or quickly. Take your time, do your homework, and ponder what you are about to read.
Step 1: Choosing the Right Raft
This is like dating, except you’re choosing a raft that’ll (hopefully) never ghost you. All I’ll say about that is, secure your boat when you get out on a river bank. Here’s what to think about:
1. Size and Capacity
Are you the lone ranger of the fly fishing world, or are you dragging along a couple of buddies? Here’s the breakdown:
- Solo Angler: Small, lightweight, and easy to throw in the back of your truck or SUV. Think minimalism, but with more room for beer and snacks. I use a SUP (Stand-up Paddleboard) for occasions like this. More on that in a YouTube video sometime. You could go with something like a Padillac, K1, or the Outfitter Mini-series from Hyside, or Outcast, and NRS offer similar designs. As a last resort you could choose the venerable float tube, aka “belly boat”. I don’t like’em because mostly they are painful for me after having had a military parachuting accident that ruined my ankle and tailbone.
- Two Anglers: This configuration should be more popular than it is and it is much more efficient for navigating smaller rivers. That said, two people drink a lot more beer than one and these rigs are somewhat space limited. One fishes, one rows, and hopefully, no one complains too much.
- Three Anglers: This is truly the sweet spot! Two fly fishers and one rower. Bigger raft, more gear options, and probably more arguing about whose turn it is to fish. However, large coolers fit nicely, and many rigs can incorporate things like dry boxes, net garages, anchors, rod holders, and all the comforts of home. A crew of three makes this a very manageable solution but it can also be used solo for experienced rafters depending on overall weight because getting it onto the trailer at the end of the day still needs to happen. Though I did it for years, these boats are a bit too big to break down and set up for every run. You really want it to stay rigged and on a trailer all the time.
2. Material
Do you want PVC (affordable but kind of hates the sun) or Hypalon (pricier but a tank in disguise)? Choose wisely, this is your river soulmate. I’ve gone with the Hypalon option at an increased thickness for extra bomb proofness.
3. Frame Options
Aluminum frames are your go-to here: lightweight, durable, and modular enough to tweak when you inevitably want to add, change, or remove something. The good folks at Down River Equipment in Wheat Ridge Colorado made my new one. After seeing and riding in my buddy Ben’s new rig last year and talking things through with Stewart at Down River I landed on their 4-bay model with snagless horns on the uprights. Don’t worry, more to come on those.
4. Portability
If your fishing spots are off the beaten path, you’ll want a raft that’s easy to inflate, deflate, and transport without looking like a sweaty disaster. I only have two options myself. The 13 foot raft and the SUP. I’m wading anything those don’t work on. If you’ve read my previous posts you already know I like to wade anyway.
5. Budget
You could go budget, or you could go “I need to explain this purchase to my partner” territory. Just remember, the fish won’t care how much you spent and there is a lot of room for DIY and creativity in building out a raft.
Step 2: Essential Accessories
Accessories are like toppings on a pizza—get the right ones, and everything’s better. Miss the essentials, and you’re just chewing through saucy dough and nobody likes a saucy tart.
1. Oars

Get oars that feel like an extension of your arms. Carbon fiber? Aluminum? Choose something that won’t betray you mid-river. I’ve used them all and to be honest…oars are like an artist’s pencil. They all work but when you find the oars that truly fit your style and movement everything becomes easier and better. I chose the shoal cut Sawyer Smoker Bandits. They’re carbon fiber and insanely light weight. My old oars were Carlisle aluminum, counter-balanced oars that were great for learning on and essentially indestructible but also heavy and for me about 6-9” too long. They are a popular choice for outfitters because of their cost and longevity. My new rig has all the bells and whistles so I wanted to save weight were I could. The Smokers are great in shallow water and pull hard in faster flows. They aren’t as indestructible as my old Carlisle’s and cost a lot more but I’m not the mutant I was when I was learning either and these will give me a performance boost while cutting weight.
2. Anchor System


You’ll want something that keeps you in place but doesn’t require Herculean effort to deploy or retrieve. I went with a Tornado 30 pounder for my slightly hefty raft. I’m also using a 2:1 anchor pully and a foot brake/release from Hyde Drift Boats (another thing I picked up from Ben). A 3/8” double-braided anchor line of 50 feet in length keeps it all tethered. I went with a highly visible color for the anchor line as it is a major hazard potential inside the boat.
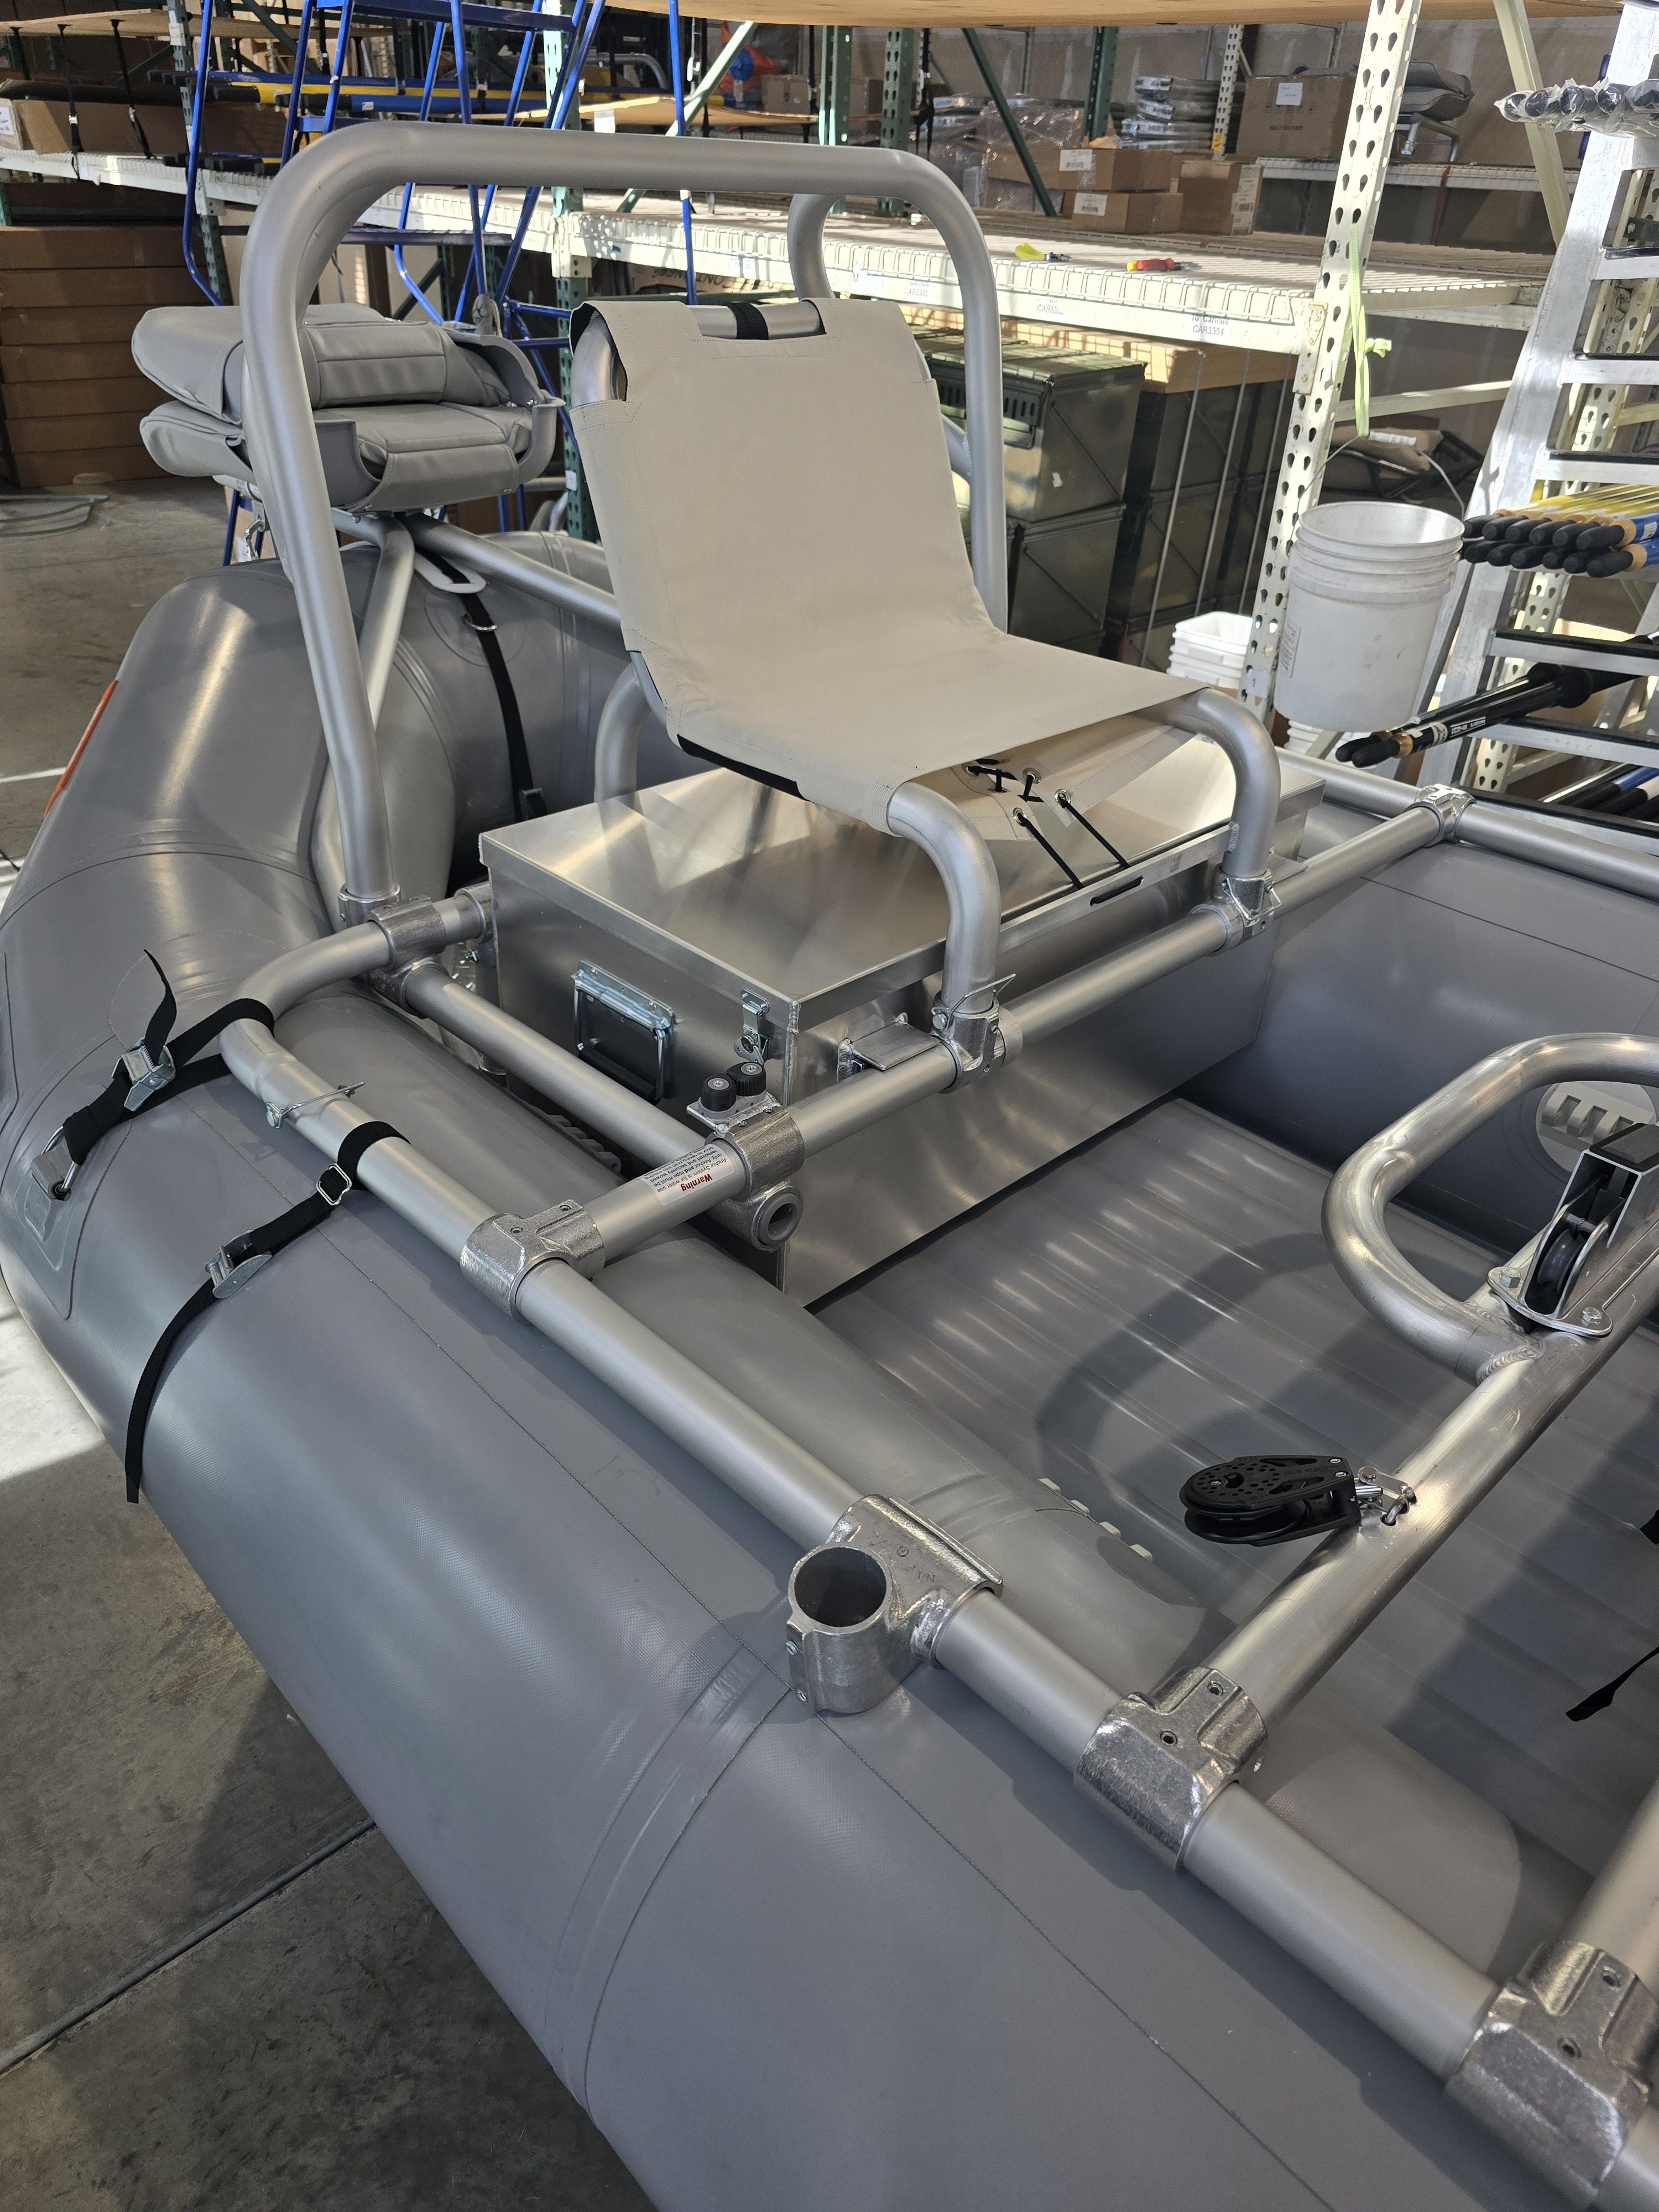
3. Casting Platforms and Lean Bars

These aren’t just for looks. They’ll save you from embarrassing falls and give you stability for those “perfect” casts. I casted and watched others cast from my last raft with no floors for years. Sure, it can be done but it sucks, and I guarantee eventually your brother-in-law is gonna’ take the opportunity to dump you in the river while on the oars (talking to you Fred). A stable platform helps prevent that and adds to the quality of fishing life on the river. Here we see my new aluminum floors and snagless lean bars that are removeable should the need arise for a little extreme whitewater action.
4. Storage Solutions
- Dry Bags and Boxes: For your gear and snacks (yes, snacks again and that usually means fried chicken, another thing Ben established as routine for me), jackets, and any other random piece of kit you commonly drag along on your river journeys.
- Coolers: Double as adult beverage storage and seats—because multi-tasking. My 110 can cooler proves sufficient for most 2-3 day trips. I’m undecided if it will double as a seat in the new rig or just a cooler. A few test runs will help me decide. Likely, the answer will depend on what the day’s goal is (whitewater, fishing, etc.). I have the option to attach a poly deck with a posh swivel seat too. Some like the seat, others like the space of the cooler top.
- Rod Holders: You need these unless you want to risk losing or breaking your expensive flyrod. Honestly, most of the choices out there aren’t ideal and each has its own set of limitations or irritations. I went with Riversmith Swiftcasts. They get the job done but you need to really think about how you mount them. Previously, I mounted mine with one on each side of the raft (see photo below). Inevitably they get pulled on, stepped on, etc. and they aren’t that tough. In the new, setup I plan to mount both on the starboard side leaving the port side open for boat entry without risk of damage to the rods and holders.

5. Safety Gear
- PFDs: Not optional. Ever. Also, not worn always. You do you Boo but check local regulations and always follow the law. Make sure you are using certified PFDs. That cheap thing you picked up at Wal-mart that doubles as a seat cushion at your daughter’s soccer game won’t be dependable on the river. Read the labels and if in doubt buy it from NRS.
- Throw Rope: For emergencies (or pulling friends out of awkward situations). Raft long enough and you will get the opportunity to help someone in need. Be ready for it and hope it isn’t you.
- First Aid Kit: Because accidents happen. I’ll go a step further and recommend everyone outdoors should have basic first-aid training and CPR. A Wilderness First-aid course would be excellent to add and a River Rescue course the cherry on top. These courses will also help you to understand what should be in your first-aid kit.
6. Pumps and Repair Kits
You’re probably not MacGyver, but you should have tools to fix a leak, tear, or address the possible range of issues that might come up mid-adventure. That means patches of the right material for your raft. A fresh tube of glue every year because they dry up. This is also material specific, so be sure you have the right glue for your boat. You’ll want to have a tool for every fitting on your raft and frame. That likely means screwdriver, hex wrench, pliers and box wrench/ratchet, and a valve tool. On that topic, always pack a spare valve, spare snap pins, set screws, and oar lock. Do you really need them? Hopefully not, but if you don’t have them, you likely will need them. Keep a headlamp in the repair kit and make sure it has fresh batteries too. Patching a hole or tear can take hours. Being prepared helps to ensure you won’t need any of it, but these trips aren’t usually downtown, right? So better to stay safe than sorry. On the pump front, keep one in the raft at all times. You might also want to keep a second one that is larger or electric in your vehicle to improve efficiency at the put-in.
Step 3: Rigging Your Raft for Fly Fishing
This is where you turn your raft into a floating fortress of angling awesomeness. Think about other boats you’ve been in or seen. What did you like about them? What are the things you liked least? Now is the time to figure out what works for you. Everyone is different. Learn from others but in the end always do what is best for you and your adventures.
1. Customize the Frame
- Add casting braces at the bow and stern.
- Add casting platforms, or make them yourself.
- Install rod holders that don’t tangle lines or poke your rowing buddy.
- Make the rower’s seat comfy because unhappy rowers’ make for shorter trips.

2. Optimize Deck Space
Clutter is the enemy. Keep gear under seats or in designated compartments, like drop bags. Think “Marie Kondo on water.” Keep those beer cans off the floor of the boat, they can be sharp. On that note, don’t crush them. Never take glass into your boat either. Add some water bottle or “beverage” holders to keep those items handy and out of the way. Think through what happens in your boat and organize it appropriately to make things efficient and tidy. You’ll appreciate the effort once on the water.
3. Create a Tangle-Free Zone
Snagged fly lines are a buzzkill, especially when they happen inside of the boat. Use stripping baskets and keep the deck clear of rogue hooks and sharp edges. Remember those snagless upright horns we talked about?
4. Anchor Placement
Mount it at the stern for easy handling and to keep it out of the casting zone. Run the anchor line inside of the frame tubes and store the excess line in a bag, bucket or something to keep it from piling up on the floor of the raft where it will inevitably get tangled or wrapped around something.
5. Add Comfort Features
Padded seats, cup holders, maybe even a Bluetooth speaker (if you’re feeling fancy). I’m not big on music while floating and fishing but for a multi-day pleasure cruise, you bet! I find seats to be a very personal choice but in talking with others the most important feature seems to be back support. River trips are commonly a minimum of 4 hours and sometimes much longer each day. Sitting on a dry box or poly deck is kind of like sitting on high school bleachers and results in a sore back for many. I prefer them in whitewater for stability, but for fishing the comfy seats are my go to.

Step 4: Testing Your Setup
Time for the big dress rehearsal. Don’t skip this, it’s like checking your tux before prom night.
- Inflation Check: No leaks? No problem.
- Weight Distribution: Load up the gear and make sure you’re not lopsided. Rafts are forgiving but when things get rough balance is critical. Keep weight low and evenly distributed.
- Anchor System: Test it. Does it work smoothly, or does it feel like a bad DIY project? Secure the anchor line with a figure-8 and a backup double-overhand knot. The anchor line is a massive opportunity to get caught up in and have things go bad fast. Keep it neat and tidy. DO NOT put a knot in the end of the anchor line inside of the boat. You want to be able to let the tag end run all the way through the system if needed to allow the boat to float free and away from a snagged anchor in rough conditions. Anchors can drop unexpectedly mid-rapid, you’ve been warned.
- Dry Run: Take it to a calm lake and get comfortable rowing, casting, and generally looking like you know what you’re doing. Practice loading and unloading it from the trailer so you can get out of the way of other users on the boat ramp quickly. Boat ramp etiquette is a big deal and those who are unaware of it create a lot of grief for everyone, including themselves. More on rafting etiquette in future posts.
I won’t be taking my own advice on the dry run. I will do pre-checks of the fully loaded rig in my driveway however. Mostly, because this isn’t my first raft. I have a solid idea of what I’m doing and how the rig should be. So, I’m relying on skill and experience instead of a dry run. Know this though…water is a hard-hearted mistress scorned and if you go into a relationship with her too casually they’ll never find your body.
Step 5: Maintenance and Care
Your raft is your homie now. It’s part of the crew. Treat it right, and it’ll return the favor. Start by giving it a name. My new homie is Eddy. It stems from the actual water feature of the same name to the “shitter’s full” reference from Christmas Vacation pertaining to long multi-day trips on the river and being the waste barge for the flotilla (IYKYK). Your name doesn’t need an explanation though. Just find one that allows you to include your new homie in conversations about life on the river.
1. Cleaning
Rinse after every trip. Dirt, grime, and especially saltwater are your raft’s worst enemies. Many western rivers legally require washing and several days of drying before you can put back into another river. Always check local regulations. Inadvertently introducing zebra mussels to a pristine river system is very bad. Don’t be that guy, or girl. Regardless, washing the dirt and grime off your raft will help it last longer and keep it looking badass. Grit grinds under the frame and in straps causing them to wear faster. A simple trip through the car wash with a high pressure sprayer takes care of most of it. If you find yourself on a long dusty or muddy road you may want to remove all of your straps and wash them in a bucket to get the grit out of them when you get home. Don’t forget the oars either! Wash them to get any invasive species off and dry them just like the boat.
2. UV Protection
A little sunscreen for your raft? Absolutely. Use a UV protectant at least annually when you put it up for the season, more often if you can. Talk to your local rafting shop or call the manufacturer to see what product is best for your chosen fish slayer.
3. Storage
Dry, cool, and out of the sun. And don’t squish it into a tiny corner—rafts need room to breathe. Some of you will no doubt need to roll it for storage indoors. I did this for years with my old raft. Do what you must but recognize that rolling and folding the raft will introduce creases in the material that over time become a weak spot. Storing your new homie on a trailer mostly inflated in a garage is ideal. Leaving some room for temperature changes and tube expansion when needed. The added benefit of being ready to roll at a moment’s notice is nice too. Remember that “efficiency” is a mantra with boating.
4. Regular Inspections
Think of it as a health checkup: look for leaks, wear and tear, and anything that could ruin your next trip. You always give your rig a quick inspection before any outing.
Tips for Fly Fishing from a Raft
Fly fishing from a raft is part art, part science, and part “what could possibly go wrong?” “Rig to avoid embarrassment.” Here are some tips to keep you sane:
Where Do I get a Raft for Fly Fishing?
Looking for the perfect raft? Start by putting in a call to Down River Equipment in Wheat Ridge Colorado. Tell Phil and Stewart I sent you. River Boatworks in Salida Colorado also makes a good frame and that is where my first raft came from. No doubt there are others but these folks will take good care of you.
It’s like fly fishing itself. Go to the source, ask your questions, have a conversation with the shop folks, be honest about your skills and desires, and you’ll walk out better prepared and more knowledgeable.
Final Thoughts
Setting up a fly fishing raft is equal parts adventure and obsession. But once it’s ready, you’ll have a floating HQ for catching fish and making memories. Take your time, do it right, and don’t forget to enjoy the ride (and the inevitable missteps along the way). Now, get out there and show the river who’s boss, or at least who’s trying.
Leave a Reply